A leaky bathtub faucet is annoying, wasteful, and usually fixable in one session if I stay organized.
I keep it simple: find where it leaks, replace the sealing parts, clean the sealing surfaces, and test slowly.
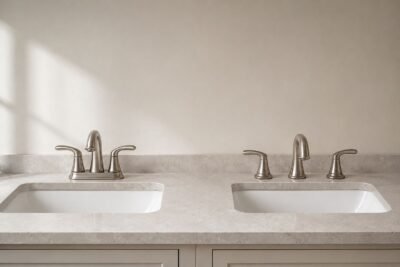
This guide fits most setups—standard bathroom tub faucets, a bathtub shower faucet combo, a wall mount tub faucet, and even specialty options like a clawfoot tub faucet or freestanding tub faucet.
If you’re not sure which internal part matches what you’re seeing (cartridge vs. stem vs. seat), a quick skim of [Understanding Faucet Structure: A Practical Guide] will make the diagnosis steps below much easier.
Quick Diagnosis — Where Is Your Tub Faucet Leaking?

Leak Spot 1 — The spout drips when the handle is OFF
If the spout drips with the handle fully off, the shutoff seal isn’t sealing. Most often it’s a worn washer (older valves) or a worn cartridge seal (common in a single handle bathroom faucet / single knob bathtub faucet setup). A damaged valve seat can also cause a stubborn drip.
Leak Spot 2 — Water seeps around the handle or trim
Leaks at the handle usually point to an O-ring, packing, or bonnet/retainer seal. If it leaks more while turning, that’s a strong sign the stem-area seal is worn.
Leak Spot 3 — Moisture behind the escutcheon (trim plate)
Water behind the trim matters because it can feed into the wall. I pull the trim, dry everything, and re-test with a flashlight so I know if it’s a seal, a loose retainer, or a connection weeping.
Leak Spot 4 — Only in shower mode, the tub spout still runs
If the shower is on but the tub spout still runs strongly, I suspect the diverter. A small trickle can be normal; a noticeable stream usually means a worn or mineral-clogged diverter—common in any bathtub shower faucet setup.
| What you see | Most likely cause | What I do next |
|---|---|---|
| Spout drips when OFF | Cartridge/washer worn, or valve seat damage | Replace sealing part; inspect seat |
| Handle/trim leaks | O-ring / packing / bonnet seal | Replace O-ring/packing; grease lightly |
| Wet behind escutcheon | Seal failure or loose retainer | Reseat/replace seals; tighten correctly |
| Shower on, tub still runs | Diverter worn/clogged | Clean or replace diverter/spout |
The Most Common Reasons a Tub Faucet Starts Leaking
Worn seals (washers / O-rings)
Seals flatten, crack, or get nicked. Heat, frequent use, and hard water speed this up. The result is either a spout drip or handle-area seepage.
A worn or gritty cartridge
A cartridge is a sealed valve core. Grit can scratch it; scale can jam it. That’s why many modern tub faucets and some shower faucets develop a slow drip over time.
A damaged valve seat (the “I replaced parts and it still drips” problem)
If you install new seals and the drip only gets “slower,” I start suspecting the seat surface. Pits or grooves prevent a perfect seal.
Mineral buildup stopping a clean seal
Scale can make sealing surfaces rough. Cleaning the valve body and parts often turns a “maybe fixed” repair into a solid one—especially with hard water.
Diverter wear in tub/shower combos
A worn diverter can’t fully route water upward. That often shows up as weak shower pressure plus water still running from the tub spout.
Tools and Parts List
General tools and supplies
I keep it minimal: screwdrivers, Allen keys, adjustable wrench/channel-locks, flashlight, towels, and a drain cover. For cleaning: white vinegar/descaler + toothbrush. For lubrication: silicone plumber’s grease (thin film only).

Common replacement parts
Most repairs come down to O-rings, washers (older valves), a cartridge/stem assembly, a valve seat (if replaceable), and small spring+seal kits. If I’m planning a style update—like black bathroom faucets, roman tub faucets, or a wall mount faucet look—I snap a quick photo so I can match finishes later with A-TORNEIRA.
Prep Before You Start (Avoid the “Halfway Stuck” Problem)

Shut off the water and relieve pressure
Use local shutoffs if you have them; otherwise shut off the main (see How to Turn Off Your Water). Then open the faucet briefly to release pressure.
Drain and plug the tub drain
I block the drain every time. Clips and set screws are tiny, bounce easily, and disappear fast.
Take photos as you go
A photo at each layer (handle → trim → retainer → cartridge orientation) prevents reassembly mistakes and saves time.
Buy the right part by matching what you remove
If possible, pull the old part first and match it at the store. This matters across standard tub faucets, wall mount tub faucet kits, and specialty trims used on freestanding/clawfoot installs.
Universal Disassembly and Reassembly Steps (The Core Repair)
Step 1 — Remove the handle cap and loosen the fastener
Pop the cap (if present) and remove the screw, or loosen the set screw (often Allen). Pull the handle straight off—wiggle gently, don’t pry against tile.
If your handle won’t budge (hidden set screw, seized fastener, or stuck-on handle), follow [How to remove faucet handle?] before you force it—this is the easiest way to avoid stripped screws or chipped tile.
Step 2 — Remove the trim plate (escutcheon)
Remove screws or a threaded ring and slide the trim off. If there’s caulk, slice it neatly first so you don’t chip tile or tear the caulk line.
Step 3 — Remove the retainer (clip or bonnet nut)
Look for a U-shaped retaining clip, a bonnet nut, or a retaining ring. I drop small parts into a bowl immediately—losing a clip is a common “can’t finish” DIY story.
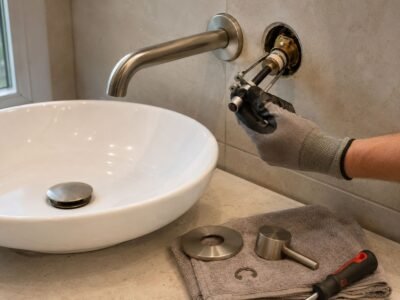
Step 4 — Pull the cartridge/stem and inspect the seals
Pull straight out. If it’s stuck, scale is often the reason—gentle rocking helps. Check O-rings for cracks/flat spots, washers for tears/hardening, and sealing edges for scratches.

Step 5 — Clean scale, grease lightly, and reinstall in the same orientation
Clean the valve body opening with vinegar/descaler and a toothbrush, then wipe clean. Apply a thin film of silicone grease to O-rings only. Reinstall the cartridge/stem in the same orientation—misalignment is a top cause of “still leaking.”
Step 6 — Turn the water on slowly and test in stages
Turn water on slowly, check around the trim first, then run cold and hot. Shut off and watch the spout for a minute. A few initial drops can be leftover water draining; steady dripping means you still have a sealing issue.
Prefer a second visual walkthrough? Here’s a solid step-by-step reference from This Old House.
Shower On but Tub Spout Still Leaks — Diverter Fix

How I tell diverter trouble from valve trouble
If it happens only in shower mode, it’s usually diverter-related. If it drips when fully off, it’s usually cartridge/washer/seat-related. Weak shower pressure plus a running tub spout strongly suggests diverter problems.
Replace O-rings on a diverter handle/rod (when applicable)
If your diverter uses a rod/handle assembly, worn O-rings can cause bypass. Replace the O-rings, clean buildup, and grease lightly.
Replace the diverter cartridge or the entire tub-spout diverter
When the diverter mechanism is worn, replacement is often faster and more reliable than repeated cleaning. A common real-world pattern is “worked for a week, then bypass returned”—that’s wear, not dirt.
And if the leak is happening at the shower side (shower head/arm, handle trim, or temperature control) rather than the tub spout diverter, jump to [How to Fix a Leaky Shower Faucet?]—the parts and checks overlap, but the fix points are different.
Still Leaking After Reassembly? Troubleshooting
Spout still drips after replacing seals — check the valve seat, debris, and alignment
If new parts didn’t stop the drip, I re-check (1) valve seat condition, (2) hidden grit/scale, and (3) cartridge/stem alignment. “It’s better but not fixed” often points to the mating surface.
Handle area still leaks — O-ring fit, grease, and retainer tension
Handle leaks are usually a small-seal issue. I confirm the O-ring size, make sure it isn’t twisted, apply a thin grease film, and snug (not over-tighten) the bonnet/retainer.
Handle won’t come off / screws are stuck — safe removal without stripping
Use the correct bit size and press firmly. For seized set screws, a small amount of penetrating oil on the screw plus patience helps. I protect finishes—especially matte black bathroom faucets—by taping plier jaws.
Older 3-handle systems — packing nut leaks and worn stems
On a 3 handle shower faucet, leaking at the handle often means packing/packing nut issues; persistent spout dripping often means stem/seat wear. Tightening packing slightly can help short-term, but replacing packing/O-rings is the real fix when it returns.
Suspect an in-wall leak — signs and what I do next
If moisture keeps appearing behind the escutcheon, or you see staining/musty smell, dry the area and re-test while watching inside with a flashlight. If the leak is behind the wall, stop and fix that first to prevent damage.
How I Prevent the Leak From Coming Back
Don’t “over-tighten” the handle
If you have to crank hard to stop dripping, something else is wrong (seat damage, debris, wrong part). Over-tightening shortens seal life.
Descale regularly if you have hard water
A quick vinegar/descaler routine helps sealing surfaces and keeps diverters moving freely.
Use silicone grease only where it belongs
Light film on O-rings and moving seals reduces tearing and makes future repairs easier. Too much grease attracts grit.
Know when repeated repairs mean it’s time to upgrade
If you keep repairing the same unit, it may be time to replace bathroom faucet hardware. If you’re upgrading the room anyway, matching tub faucets and shower faucets (for example, wall mount tub faucet styles or roman tub faucets) looks best when you keep the finish consistent—this is where A-TORNEIRA can be your anchor keyword for a cohesive set.