1")
Before you start reading, I came across this YouTube video—hope it helps!
That drip… drip… drip is the kind of sound that follows you around the house. You try to ignore it. You can’t. And then you start thinking, “Is this costing money too?”
It is. The USGS says a small drip is about 0.33 mL, which works out to roughly 3,000 drips per liter.
I’ve been writing about taps for 10 years, and I still treat washer changes like a tiny “surgery.” Slow hands, clean parts, no panic.
If you do it right, the leak stops. If you rush it… you’ll learn new swear words.
If your tap is older and has that classic multi-turn feel, it’s often the same family of designs you’ll see in two-handle kitchen faucet styles—and yes, washers are usually the first thing to wear out.
Preparation: Diagnosis, Tools, and Water Isolation
Signs the Washer Is the Problem
 2")
A worn washer usually looks like this:
- The tap drips from the spout when it’s “off.”
- If you crank the handle tighter, the drip slows for a bit.
- Water is not leaking from around the handle.
If the water is coming from the handle area, you may be dealing with an O-ring or packing instead.
If you’re not 100% sure the drip is coming from a worn washer, don’t worry—I do this quick checklist every time. Start with common causes of a leaking faucet before you take anything apart, because the fix changes depending on where the water is escaping.
Quick Hot/Cold Check (Saves Half Your Time)
 3")
If you have separate hot and cold taps and only one side leaks, don’t guess.
Before you shut anything off, run the tap briefly and feel the temperature. Which one is the dripper—hot or cold?
Still unsure? Close one isolation valve under the sink (hot or cold) and test. If the drip stops, you found your side.
I see this a lot in bathroom installs, especially with widespread bathroom faucet setups where hot and cold wear at different rates. Knowing the side saves you time and keeps you from buying parts you don’t need.
How to Check If Your Tap Uses a Washer at All
Most washer taps are compression taps.
Fast test: does the handle take several turns to fully open and close? If yes, it likely has a washer.
If it’s a quick “quarter-turn,” it may use a cartridge or ceramic disks instead.
If you open the tap and it feels like a quarter-turn cartridge style, you may not have a washer problem at all. In that case, the faster fix is usually a cartridge swap—see my replace a faucet cartridge in minutes guide.
Tools & Materials Checklist (With Pro Alternatives)
Essentials: screwdriver, adjustable wrench, needle-nose pliers, replacement washers, old toothbrush/cloth, a tiny bit of silicone grease.
Pro extras: strap wrench (protects chrome), penetrating lubricant (for stuck parts), valve-seat reseating tool.
I keep spare washers in my toolbox because leaks love weekends and late nights.
No Isolation Valve? How to Locate the Main Stopcock
Look under the sink for two small shutoff valves. Turn them clockwise to close.
No valves? Use the home’s main shutoff, then open the tap to confirm the water stops.
Phase 1: Professional Disassembly and Protection
Step 1: Prepare the Workspace and Protect the Drain
Picture this: I’m kneeling on a towel, flashlight bouncing off chrome, and the sink is basically a “parts-eating machine.”
Cover the drain with a cloth or plug. Do this first. Tiny screws like to escape.
Lay a towel in the sink too, so parts don’t chip the surface.
 4")
Step 2: Find and Remove the Cap or Cover Neatly
Most handles have a small hot/cold cap.
Pry gently from the edge and lift it off. Put it in a cup immediately.
Step 3: Remove the Tap Handle (But First—Turn It to “ON”)
Here’s the move people skip.
With the water already shut off, rotate the tap to the open position before you start loosening anything deeper.
Why? If the tap is fully closed and you force the headworks loose, the internal parts can be under load. That pressure can chew up the washer or scratch the valve seat.
After you’ve turned it “ON,” remove the screw under the cap, then lift the handle straight up.
Handle stuck? Wiggle and lift gently. Don’t yank.
Still stuck? That’s normal—soap scum and mineral scale can glue a handle in place like cement. Follow my remove a faucet handle safely walkthrough so you don’t crack the handle or strip the screw.
Step 4: Removing the Headworks (The Assembly Inside the Tap)
This is the part many people call “the valve body,” and pros often say “headworks.”
If the words “headworks” and “valve seat” feel blurry, take 2 minutes to see how the parts stack together. My faucet structure explained guide makes this step way less confusing when you’re holding the pieces in your hand.
Wrap the nut with a cloth (or use a strap wrench), then loosen counterclockwise with your adjustable wrench.
If it won’t move, use a tiny bit of penetrating lubricant and wait a few minutes. Patience beats broken parts.
Once loose, you should be able to unscrew the rest by hand.
Step 5: Lift Out the Tap Mechanism and Keep Parts Organised
Pull the mechanism out and lay parts in order on your towel.
I line them up left-to-right like a simple map. Future-me always thanks past-me.
 5")
Phase 2: Washer Replacement and Valve Seat Work
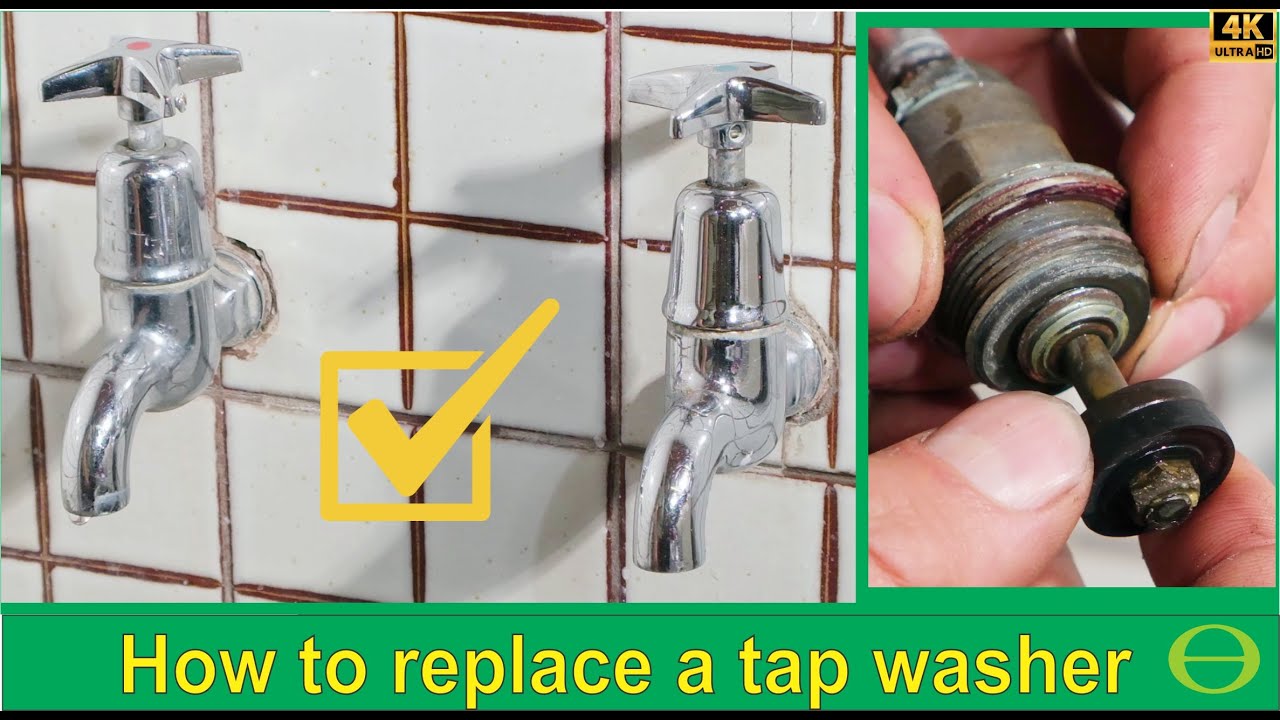
Step 6: Locate the Washer (Where It Sits and How It’s Fastened)
Flip the mechanism over. The washer sits at the very bottom.
It might be held by a small screw, pressed on, or stuck hard because it’s old and stiff.
Step 7: Remove the Old Washer (Screwed, Pressed, or Stuck Fast)
If there’s a screw, remove it carefully.
If it’s pressed on, pry gently with a flat screwdriver.
True story: I once heard a sharp ping and watched a tiny screw bounce toward the drain like it had a mission. The cloth over the drain stopped it with two centimeters to spare. I actually laughed—then exhaled.
Step 8: Clean the Washer Area for a Better Seal
Use a toothbrush and cloth to clean the washer area.
Scrub away grit, mineral crust, and old rubber bits. A clean surface seals better. Simple as that.
Step 9: Install the New Washer (Fit, Flatness, and Firmness)
Match the new washer to the old one. Same size, same thickness.
If the old washer is cracked, crumbling, or squashed so badly you can’t tell its original shape, take the whole headworks (the assembly you removed) to the hardware store and match it there. It saves beginners from buying the wrong size.
 6")
Seat the new washer flat. Tighten the washer screw snug—firm, not furious.
Add a tiny smear of plumber’s grade silicone grease (food-grade silicone grease) on threads, so the next repair isn’t a wrestling match.
If your washer fits neatly and sits flat, you’re doing it right.
Step 10: Inspect the Valve Seat (When a New Washer Alone Won’t Help)
Look inside the tap body. The washer presses against the valve seat.
If the seat is pitted or grooved, a new washer may still drip.
A peer-reviewed case study in Metals investigated failed brass parts used in drinking water systems and reported corrosion issues, including dezincification, with real components failing after service lives as short as 8 months to 5 years.
Plain-English version: if the metal looks like the moon’s surface—all pits and craters—changing the washer won’t fix the leak.
 7")
Light damage can sometimes be improved with a reseating tool. Deep damage is a “stop and call” moment.
Phase 3: Reassembly and Controlled Testing
Step 11: Reassemble the Tap (Tighten Enough—But Not Too Much)
Reassemble in reverse order.
Tighten the headworks snug, then stop. Over-tightening can strip threads and make the handle stiff.
Step 12: Turn Water Back On (A Controlled Restart That Prevents Leaks)
Turn the water back on slowly.
Crack the tap open a little to let air escape. This reduces sudden pressure shock.
Leaks are common enough that the Water Research Foundation’s major home water study lists leaks at 13% of indoor household water use (in their fixture breakdown).
So yeah—catching a leak early matters.
If you’re doing washer fixes more than once a year, it might be a sign the faucet is simply tired. I usually tell people to consider a fresh bathroom sink faucet replacement option instead of chasing the same leak again and again.
Step 13: Final Inspection (How to Catch Hidden Seepage)
Dry everything first. Bone dry.
Then watch: around the handle area, around the headworks nut, and from the spout.
Check again after 30 minutes. Some leaks like to “wait” until you walk away.
 8")
When DIY Stops: Call a Licensed Plumber If…
Signs of Cross-Threading or Metal Fatigue
If parts don’t thread smoothly by hand, don’t force it.
If metal looks cracked, warped, or unusually thin, stop.
Seized Components That Won’t Budge With Reasonable Force
If you’re using full-body strength, you’re past the safe line.
Persistent Leaks After Seat Work
If you replaced the washer, cleaned carefully, and it still drips, the seat may be too damaged—or the tap may use a different internal design than it looks like.
And if the valve seat looks like the moon and the drip won’t quit, sometimes the cleanest fix is a full swap. If your leak is happening at the kitchen sink, start by browsing kitchen sink faucet options so you can compare sizes and handle types before you buy.