1")
That tiny plink… plink… plink from the sink can keep you staring at the ceiling at 2 a.m. Then you open the cabinet and think, “Is this about to turn into a flood?”
I’ve spent the last 10 years working with bathroom faucets—installing them, testing them, and fixing the same annoying leaks. I also work closely with A-TORNEIRA faucets, so I pay extra attention to the small steps that protect the valve, stop drips, and keep your cabinet dry.
If you’re hearing drip-drip at night, it helps to know what’s behind it. I broke down the most common faucet leak causes here.
Let’s do this in a calm, smart order.
Preparation & Safety (Phase 1)
Gather Tools & Materials
Set these beside the sink before you start:
- Adjustable wrench (or two small wrenches)
- Basin wrench (for tight spaces)
- Bucket + towel + a small cup
- Flashlight or headlamp
- Painter’s tape + marker (label hot/cold)
- Putty knife or old plastic card
- Penetrating oil (for stuck nuts)
- New supply lines (optional, but smart if yours are stiff/old)
 2")
Identify Your Configuration
Look at the holes on the sink deck:
- One-hole (single handle)
- Centerset (3 holes, usually one piece)
- Widespread (3 holes, separate handles)
 3")
If you’re shopping right now, start with the basics—size and hole layout. I keep our main options in one place: bathroom sink faucet collection.
If your sink is one-hole, you’ll want a clean, simple fit—here are our single-hole faucet options.
Protect Your Workspace
Clear the cabinet. Lay a towel down.
Quick scene from real life: I once bumped a cleaning bottle while crawling under a sink. It tipped, spilled, and suddenly I’m fixing a faucet while everything smells like lemon soap. Clear space = fewer surprises.
Shut Off the Water Supply
Turn both shutoff valves under the sink clockwise until they stop.
Then open the faucet. Water should slow and stop.
If it doesn’t stop, your shutoff valve might be worn. Use the main water shutoff, or get help if you’re not sure.
One safety note I take seriously: metals in plumbing can show up in water after parts sit, especially with certain brass surfaces. A materials study explains how lead can move to the surface and leach into water under some conditions.
 4")
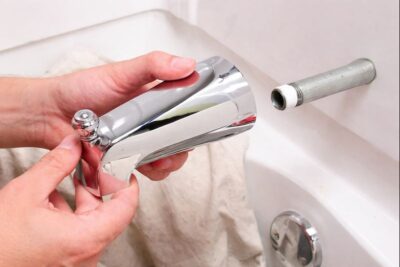
Remove the Old Bathroom Faucet (Phase 2)
This part feels “hard” because you’re upside down in a tight cabinet. The steps are simple. The space is the problem.
Disconnect the Supply Lines
Put a bucket under the valves.
Use two tools if you can: one holds the shutoff valve steady, the other loosens the nut on the supply line. This helps you avoid twisting the valve or stressing the pipe behind it.
Label hot and cold with tape. Later, you won’t have to guess.
Remove the Old Drain & Pop-up Assembly
If your faucet has a lift rod (the rod you pull up to close the drain), you’ll see its linkage under the sink.
Typical steps:
- Unscrew the small nut holding the pivot rod to the drain.
- Pull the pivot rod out (towel ready—water may drip).
- Lift the stopper out from above.
- Loosen the big drain nut underneath.
- Push the drain body up and out.
Picture this: your shoulder against the cabinet wall, one hand trying to hold a flashlight, the other hand turning a nut you can’t even see. Normal! Go slow.
Loosen Mounting Hardware
Look up under the sink. You’ll see mounting nuts or a bracket holding the faucet.
If it’s crusty, spray penetrating oil and wait a minute.
If the nuts look green, chalky, or “frozen,” that’s usually corrosion doing its thing. Here’s a quick guide to spotting the early signs of faucet corrosion.
If your hand can’t fit, use a basin wrench. That tool was made for this exact moment.
If the faucet won’t lift out from above, it’s probably stuck to old putty or mineral buildup. Wiggle gently. Don’t yank.
Clean the Mounting Surface
Scrape off old putty/silicone. Wipe clean. Dry it.
This step prevents the “mystery wet ring” around the base later.
Quick thought before you replace the whole faucet: sometimes the drip is just a worn cartridge. If your body and finish still look good, the faster fix is swapping the faucet cartridge replacement steps.
Install the New Bathroom Faucet (Phase 3)
Now it starts feeling like progress. Keep your order clean, and the cabinet work stays easy.
Dry-Fit and Align the Gasket
Place the new faucet (and deck plate if you’re using one) on the sink without tightening anything.
Stand in front of the sink and look straight at it. Is the spout centered? Are the handles even?
I like to mark the sink’s center with a tiny piece of tape. It keeps my eyes honest.
For 3-hole sinks, the easiest install is often a one-piece layout. If that’s your setup, check the centerset faucet styles.
 5")
Secure the Faucet to the Sink
From underneath, install the mounting hardware your faucet came with.
Tighten by hand first, then snug it with a wrench.
If you over-tighten, you can warp the gasket or stress the sink. If you’re sweating and grunting, you’re probably past “snug.”
If your handles are separate from the spout, take an extra second to confirm spacing before tightening everything down. That layout is usually called widespread—here are our widespread faucet designs.
Install the New Pop-up Drain
I put this here on purpose.
If you connect the supply lines first, the cabinet becomes a jungle of hoses. Then installing the drain (which is wide and awkward) turns into finger gymnastics.
Drain basics (follow your drain instructions if they differ):
- Set the top gasket and drop the drain body into the hole.
- Under the sink, slide on the bottom gasket and nut.
- Tighten until snug and aligned.
- Reconnect the lift rod and pivot rod so the stopper opens and closes smoothly.
Putty vs Silicone (Don’t Skip This)
People mix these up all the time.
- Plumber’s putty is great for many metal sinks and standard drain flanges.
- Silicone is the safer choice for stone surfaces like marble or granite.
Why? Oil-based putty can stain porous stone. If your sink or countertop is marble/granite (or any natural stone), use silicone unless the manufacturer says otherwise.
Pre-Flush the Shutoff Valves (Before Connecting the New Faucet)
This step saves new faucets from getting a mouthful of grit on day one.
Here’s how I do it:
- Keep the faucet not connected for a moment.
- Put a bucket under each shutoff valve.
- If you have short spare hoses, connect one to the valve and aim it into the bucket.
- Open the shutoff valve slowly for a few seconds, then close it.
Do this for both hot and cold. Keep the water aimed into the bucket, not the cabinet wall. Cabinets hate surprise showers.
 6")
Connect the Water Lines
If your old supply lines are stiff, cracked, or rusty, replace them. It’s cheap protection.
Connect hot and cold to the shutoff valves (hot is usually left, cold is usually right).
Two rules I follow every time:
- Never use Teflon tape on a connection that seals with a rubber washer. Many modern braided hoses seal with a gasket/washer. Tape can mess up the pressure on that washer and cause a slow leak.
- Compression-style connections usually don’t need tape. Tighten snug, then a small extra turn.
Save tape for the few cases where the instructions call for it, usually on tapered pipe threads (not washer-sealed joints).
Drain, Flush & Leak Test (Phase 4)
Remove the Aerator and Flush Through the Faucet
If you can, remove the aerator (the small screen at the end of the spout). Open the drain.
If the aerator feels stuck, don’t grab it with bare pliers and pray—one slip can scar the finish. Use this method for removing an aerator without scratches.
Turn on cold water, then hot, for a few minutes.
Why do I care so much about flushing? Because water that sits can pick up metals and gunk, and the first rush can be weird.
A case study in Environmental Science: Water Research & Technology recorded that flushing dropped average lead in cold water from 2.4 ppb to 1.0 ppb, while also measuring a brief spike up to 150 ppb during flushing as discolored water moved through the system.
Inspect for Leaks
Turn the shutoff valves on slowly.
Then use a dry paper towel to touch each connection:
- At the shutoff valves
- At the faucet connections
- Around the drain nut
- Around the pivot rod nut
Paper towels don’t lie. Even one drop shows up.
If you find a leak, tighten a tiny bit, then check again. Tiny moves win here.
 7")
Maintain for Longevity
Once a month, open the cabinet and do a 10-second check.
Look for dampness, mineral crust, or that “something smells wet” feeling.
Flushing habits matter too. A pilot study in Frontiers in Water found reductions in bacteria and Legionella right after a 5-minute flush, with results influenced by things like temperature and pipe material.
If your faucet swap feels slow, that’s fine. Slow is safe. Fast is how you miss the tiny leak that turns into a cabinet mess later.